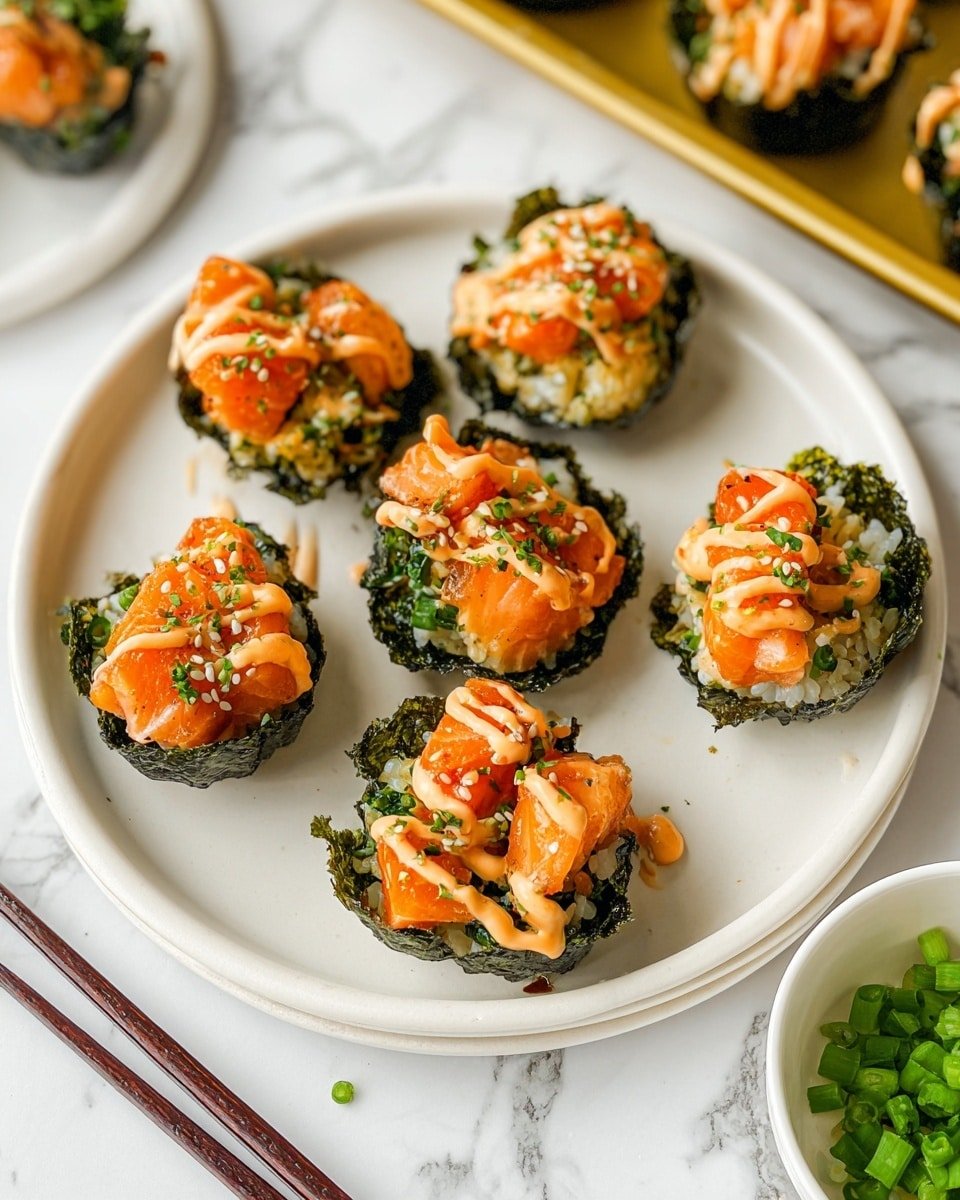
Start Here: Cozy Cravings with Easy Baked Salmon Sushi Cups Recipe
Whenever I’m craving sushi but don’t want to fuss with rolling or raw fish, these Easy Baked Salmon Sushi Cups hit the spot. They came together one evening when I wanted something flavorful and fun, but still simple enough to whip up after work. The cozy, warm sushi rice paired with perfectly baked salmon in little nori nests always feels like a comforting treat.
You’ll love how easy it is to assemble these sushi cups — no rolling mats required! The salmon gets a gentle kick from sriracha and creamy mayo, then bakes to tender perfection on top of a tangy sushi rice base. The aroma of toasted nori and baked salmon fills the kitchen and gets everyone’s attention right away.
Whether you’re feeding a crowd or just craving a snack with a twist, this Easy Baked Salmon Sushi Cups Recipe delivers bright flavors wrapped up in bite-sized fun. Plus, with just 30 minutes total, it’s a weeknight winner you’ll keep coming back to.
✧ Flavor Boost Ideas
- Citrus Lift: Add a bright splash of lemon or orange juice.
- Spice Spark: Sprinkle in chili flakes or smoked paprika.
- Herb Pop: Finish with chopped parsley, basil, or mint.
- Crunch Factor: Add toasted nuts or seeds for texture.
Prep Like a Pro
Before you dive in, getting everything lined up makes a huge difference. I always find that prepping the ingredients and tools first—what the French call mise en place—keeps the process smooth and stress-free. You’ll appreciate the flow once you’re ready to move from mixing the salmon to molding the sushi cups.
- Sharp knife for cutting salmon and nori sheets
- Measuring cups and spoons for rice and seasonings
- Microwave-safe bowl for dissolving vinegar and sugar
- Muffin tin to shape the sushi cups
- Mixing bowls for the salmon marinade and rice
- Cooking spray to grease the muffin tin
⏱ Prep Tips & Time Savers
Smart shortcuts and do-ahead steps to keep cooking smooth and quick.
Gather Your Ingredients

Accurate measuring, especially of the sushi rice and seasonings, helps nail that perfect texture and flavor every time. Here’s a quick rundown of what you’ll need on hand for the Easy Baked Salmon Sushi Cups Recipe:
- Salmon cubes – fresh, tender bite-sized pieces
- Light soy sauce – for salty umami depth
- Kewpie Mayo – creamy and slightly sweet Japanese mayo
- Sriracha – spicy kick to balance the creaminess
- Sesame oil – for that toasty, nutty aroma
- Uncooked sushi rice – sticky and perfect for molding
- Rice vinegar – bright tanginess for the rice
- White sugar – to gently sweeten the vinegar mix
- Nori sheets – cut to fit your muffin tin cups
- Furikake garnish – savory sprinkle for finishing touches
- Green onion – fresh and crisp garnish
- Cooking spray – to keep those sushi cups from sticking
If you don’t have Kewpie mayo, regular Japanese mayo or even a mix of regular mayo and a splash of rice vinegar will work well. For an alternative to furikake, try toasted sesame seeds or finely chopped toasted seaweed flakes.
Step-by-Step to Easy Baked Salmon Sushi Cups Recipe Bliss
This recipe is so rewarding and it’s surprisingly quick. Let’s walk through the steps to get those flavorful salmon sushi cups out of the oven and onto your plate.
- Cook the sushi rice: Follow the package instructions closely. I like to rinse the rice thoroughly beforehand to ensure it’s perfectly sticky but not gummy.
- Make the vinegar mixture: Combine rice vinegar and sugar in a microwave-safe bowl. Heat it just until the sugar dissolves, about 30 seconds. Pour this over the cooked rice and gently fold to coat every grain. Set it aside to cool slightly while prepping the salmon.
- Preheat your oven: Set it to 400℉ to get ready for baking.
- Mix the salmon: In a bowl, combine cubed salmon, soy sauce, Kewpie mayonnaise, sriracha, and sesame oil. Mix until every piece is luxuriously coated.
- Prepare the nori cups: Cut nori sheets into four rectangles or squares. Make sure they’re sized right to line the muffin tin wells.
- Assemble the cups: Spray the muffin tin with cooking spray. Place a nori square into each cup, then press a spoonful of sushi rice into the center, gently spreading it to form the base. Top with an even layer of the salmon mixture.
- Bake: Pop the muffin tin into the oven for 15 minutes. You’re looking for the salmon to cook through and the tops to get that slight golden glow.
- Finish and garnish: Let the sushi cups cool a few minutes out of the oven. Drizzle extra sriracha or spicy mayo on top for an added zing. Sprinkle furikake and chopped green onions for that final hit of flavor and crunch.
Serve & Savor

Now the fun part — gathering everyone around and enjoying these bite-sized, flavor-packed sushi cups. They’re perfect finger food for sharing or a light meal that feels special but not fussy. I love serving them warm straight from the oven, but they hold up beautifully for a chilled snack too.
🍽 Serving Suggestions
- Perfect Pairings: Light cucumber salad or edamame with a cold glass of sake or green tea.
- Plating Touch: Serve on a platter lined with shiso leaves or sliced avocado for a pop of color.
- Leftover Magic: Chop and fold into a leafy salad or rice bowl the next day.
- Celebration Twist: Add a dollop of wasabi mayo or top with tobiko for an elegant party bite.
Creative Variations with Easy Baked Salmon Sushi Cups Recipe
- Swap salmon for cooked shrimp or crab for a seafood twist.
- Add finely diced mango or avocado to the salmon mix for creaminess and sweetness.
- For a vegan version, try marinated tofu cubes with the same spicy mayo blend.
- Season the rice with a bit of ginger powder or finely grated fresh ginger for warmth.
- Top with thin slices of radish or pickled ginger for extra zing.
- Use black or brown sushi rice for a nuttier flavor and lovely visual contrast.
Make-Ahead, Store & Reheat
- Make the sushi cups up to 24 hours ahead; cover tightly and refrigerate.
- Reheat in a 350℉ oven for 7-10 minutes to regain that fresh baked warmth.
- For quick reheating, microwave on medium power for 60-90 seconds, though the nori might soften slightly.
- Store leftovers in an airtight container for up to 2 days for best taste.
Your Easy Baked Salmon Sushi Cups Recipe Questions Answered
- Can I use regular mayo instead of Kewpie mayo? Yes! Just add a pinch of rice vinegar for a closer flavor match.
- What if I don’t have furikake? Toasted sesame seeds or crumbled nori flakes make great garnishes.
- How do I make the sushi rice sticky enough? Rinse rice well before cooking and follow package instructions closely. Adding the vinegar mixture while rice is hot helps create that perfect sticky texture.
- Can I bake this without a muffin tin? You could try mini ramekins or small oven-safe bowls, but muffin tins work best for the crisp nori shape.
- Is this recipe kid-friendly? Absolutely! Just adjust or omit the sriracha to suit milder tastes.
Easy Baked Salmon Sushi Cups Recipe
Easy Baked Salmon Sushi Cups are a fun and flavorful twist on traditional sushi, featuring cubed salmon mixed with a spicy mayo sauce atop seasoned sushi rice, all baked to perfection inside crispy nori cups. Perfect for a quick appetizer or a delightful main dish that combines the tastes of Japan with simple preparation.
- Prep Time: 15 minutes
- Cook Time: 15 minutes
- Total Time: 30 minutes
- Yield: 12 servings
- Category: Appetizer
- Method: Baking
- Cuisine: Japanese
- Diet: Low Lactose
Ingredients
Sushi Rice
- 1 ½ cup uncooked sushi rice
- 1 tablespoon rice vinegar
- 2 teaspoon white sugar
Salmon Mixture
- 1 lb salmon, cubed
- 1 tbsp light soy sauce
- 1 tbsp Kewpie Mayo
- 1 tbsp Sriracha
- 1 tsp sesame oil
Assembly and Garnish
- 3 large nori sheets
- furikake, for garnish
- 1 green onion, chopped for garnish
- cooking spray
Instructions
- Cook the rice: Cook sushi rice according to package instructions until tender and fully cooked.
- Prepare vinegar seasoning: In a microwave-safe bowl, combine rice vinegar and sugar. Microwave for about 30 seconds or until the sugar dissolves. Pour this mixture over the hot cooked rice and mix thoroughly to season. Set aside.
- Preheat oven: Preheat your oven to 400℉ to prepare for baking the sushi cups.
- Mix salmon topping: In a bowl, combine the cubed salmon, light soy sauce, Kewpie mayo, Sriracha, and sesame oil. Mix until all ingredients are well incorporated. Set aside.
- Prepare nori bases: Cut the nori sheets into 4 equal rectangles or squares large enough to fit inside the cups of a muffin tin.
- Assemble sushi cups: Lightly grease a muffin tin with cooking spray. Place each nori piece into a muffin cup. Spoon a layer of sushi rice onto each nori sheet and press down lightly to form a base. Then add a layer of the salmon mixture on top of the rice.
- Bake: Place the muffin tin in the oven and bake at 400℉ for 15 minutes or until the salmon is cooked through and the tops start to turn golden.
- Garnish and serve: Remove the baked sushi cups from the oven and allow them to cool for a few minutes. Drizzle additional Sriracha or spicy mayo on top, then garnish with furikake and chopped green onions. Serve immediately and enjoy.
Notes
- Use cold cooked rice for best results and avoid sogginess.
- Adjust spiciness by altering the amount of Sriracha or mayo added to the salmon mixture.
- Make sure the nori is fresh and not too dry to prevent cracking when shaping.
- If you do not have Kewpie mayo, regular Japanese-style mayo or any creamy mayo can substitute.
- Furikake adds a nice salty and umami touch but can be omitted if unavailable.
- Lightly oiling the muffin tin ensures easy removal of the sushi cups after baking.


